Are you looking for ways to keep students engaged (both at-home and in-school?) The Bitmoji Classroom is an AMAZING way to do this!
I'm going to show you the basic steps, to help you get started with your very own Bitmoji Classroom TODAY!
Note: My Classroom template and objects (above) come from my paid subscription to Sidekick Studios. This post contains affiliate links to materials I recommend. If you purchase something using these links I may receive a small commission.
Step 1, Classroom Walls and Floor:
Open Google Slides and create a new presentation. Delete the text boxes on the slide.
Click "Background" in your menu bar. (If you don't see this at first, click on the slide itself and the menu should change.)
When this box appears, click "Choose image."
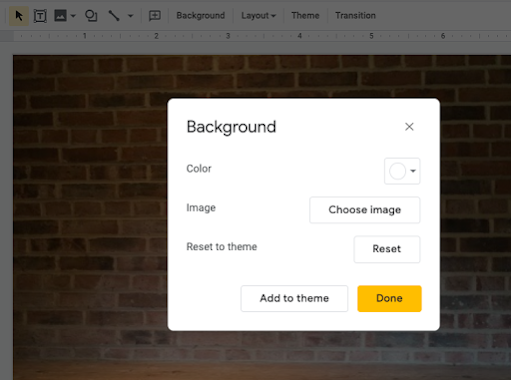
Choose "Google Image Search."
In the search box, type in "Wall floor background." Scroll through until you find an image you like. Click on the image to select it. When the blue box appears around it, click "Insert." Choose "Done" on the next prompt.
You now have a static template for your classroom! It's time to start looking for items to fill up the room!
Step 2, Classroom Walls and Floor:
This is where the fun begins! In the menu bar, click "Insert" and then choose "Image" then "Search the web."
Start typing in the names of items you wish to have in your classroom. Add either the word TRANSPARENT or VECTOR after your item word. This will ensure the images have transparent backgrounds.
After you select the item, click "insert." It will now appear on your slide. You can move it and resize it to fit.
TIP: If you want to changing the direction an item faces, follow these steps:
- Click on the item and right click on your track pad for an editing menu.
- Choose "Rotate" and "Flip horizontally." This will flip your image!
Keep adding items to your classroom! Be thoughtful about how you want students to connect to each item. For example, in my classroom I've added a marble jar, which I have linked to our digital marble jar. I also have a clock, which I will either link to our schedule or our work with telling time!TIP: You can change the color of objects!
Click on the image you wish to alter, then choose "Format options" in your menu bar. Scroll down to "Recolor." Choose a color you like!
Step 3, Add Links to Make Interactive:
There are two things to consider: do you want students to be able to move classroom objects around--OR--do you want objects to remain fixed and unmovable.
If you don't mind your objects being moved around, then skip ahead to "LINKS."
I like my objects mostly fixed. So, when I am happy with my classroom template, I do this:
- I make a copy of my slide (this becomes MY template.) I now have 2 versions of the same slide.
- On ONE slide, I download it as a PNG image, just as I did for the walls and floor. I click "Background" and "Choose Image" then upload that PNG.
- I then delete all the items from the top layer.
LINKS
If your objects are not fixed, you can click on each object and add links directly to the objects.
If your objects are not moveable, because they been saved to the background image, you will need to add a shape on top of the object.
In the menu, choose "Shapes." Find the shape you like and insert it onto the page. Resize it and move it on top of the object you wish to link. To make it transparent, click on the paint can and choose "transparent." Then click on the "Border color" pencil and choose transparent.
Then you will add the link to that shape layer.
Safety:
When adding videos or songs for children from YOUTUBE, use the website SAFE YOUTUBE. This will allow you to convert the Youtube link into a safe link (without adds or the ability for students to click on inappropriate links.)
Bitmoji Image:
Now, if you haven't already created your own personalized Bitmoji character, you'll want to spend some time on this fun step! Head over to Bitmoji.com to download the app (for iPhone or Android) and have a BLAST creating your character!
If you have already done this, you'll still want to head over to Bitmoji.com to download the app for Chromebook. This will allow you to choose your favorite character and add it to your "classroom."
When you click on the app in your Extensions list, you will need to sort through the character poses. Use key words, such as "pose" or "sit" to find characters without much text or additional props.
Have Fun:
There are TONS of fun tech skills you can incorporate into your Bitmoji Classroom. If you are looking for more inspiration and ways to connect with others, I highly recommend you head over to Bitmoji Craze for Educators on Facebook!
Click on this link to download this Bitmoji Classroom template for free! Please note: if you are looking for the items in my first Bitmoji Classroom image (below 👇) those are mostly from Sidekick Studio. I subscribe to their AMAZING Teacher Stock Photo & Template Membership!
Drop a comment below and let me know what questions or ideas you have for your Bitmoji Classroom!
loading..


.png)

.png)


No comments